Share a glimpse into my creative world.........


Friday 24 December 2010

Christmas Projects

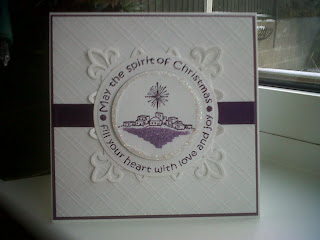
Hi, it's Christmas Eve and I thought I would share some of the Christmas items/cards that I have made with you all! Firstly this is a tree decoration using the Bethlehem stamp from Art Impressions, the sentiment is from Justrite stamps.


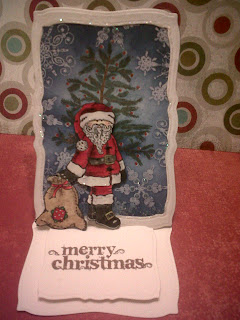
 I just added glitter to give dimension and a little sparkle and of course could not have made this without the use of my trusted wizard and spellbinder dies.


I just love this Santa stamp from Molly Blooms designs! Her blog is definately worth visiting for inspiration.


Happy Christmas and best wishes for 2011


Monday 6 December 2010

Christmas cards

Hi everyone

I am still working with the single snowflake, I think I was inspired by the large snowfall we had last week! I decided to add the 'celebrate the season' sentiment to my card from 'Just Rite Stamps'. Overall I am pleased with the finished card.


Saturday 27 November 2010

Christmas Snowflake

What a wonderful Saturday morning, no work and around 6 inches of snow! Snow is so beautiful especially when you don't have to drive in it. Today I made a Christmas card with just a single snowflake. I was hoping to achieve an elegant, but simple looking card.


I made good use of my score pal and wizard dies for this card, the snow flake stamp was from Lavina stamps.

Sunday 31 October 2010

Molly Blooms

Hi everyone
Sorry it's taken a while for me to update my post, I've had a rather hectic week. Anyway last week I went along to the craft show at Doncaster Dome, I had a great day! I was fortunate to meet Clare the designer of the new Molly Blooms stamps. I have to say her work is amazing, Clare was demoing and her card samples were inspiring. I couldn't resist buying some of her gorgeous stamps.
The card I have made today is stamped using two of Clare's stamps, Santa and the Christmas tree. I have also used the snow flakes stamps from Lavina stamps. I stamped the Christmas tree in brown memento and coloured with prisma pencils. Snowflakes were stamped in versamark and heat embossed using holographic embossing powder. The background was completed using Tim Holtz Distress Ink in chipped sapphire. Santa was stamped in black memento and coloured using a combination of prisma pencils and copics. To complete I added some glossy accents and glitter! Two of my favourite items.


Tuesday 19 October 2010

Quick Christmas Card

Hi Everyone
My sister in law is flying off to New Zealand this weekend and will be staying there for Christmas. I decided to make a small Christmas card for her so that she can take it with her. I also needed to make a quick  card as I am currently working on a mini scrap book for her Christmas present, which needs to be finished for Saturday.

I used the Christmas tree from Clarity stamps which I stamped in adirondack cranberry ink and then clear embossed. I also used the snowflake stamp from Lavina stamps and heat embossed in holographic embossing powder.

Unfortunately the photos are not great due to the light, sorry!


Tuesday 12 October 2010

Glittered Geisha

Hi Everyone, I did say that I had been working on a glittery project to share with you, well here are the two cards that I have made using the geisha stamp from creative expressions.


I stamped the images on to acetate using black stazon. Once dry (best left overnight) I used different shades of pee wee glitter. I also used the blossom stamp from clarity stamps again this was stamped using black stazon. Distress ink (weathered wood) was used to create the sky background and the blossom was coloured using gel pens and a little glitter. I have to say that I was pleased with both cards, however the tunnel card photo doesn't do the card credit. I think the reflection of the acetate with the camera didn't help.

Saturday 9 October 2010

Hero Arts Flower

Hi everyone, I have just completed this card using the Hero Arts Flower Stamps which have been in my stash for at least 6 months unopened. I have used one of my mega nesties to create an easal card. I also used swirly stamps from Banana Frog. Paper is from 'My Minds Eye'. I completed the card using pee wee glitter and glossy accents.


I decided to write my message on the front of the card, just to make it a little different to the traditional card and also because I love the Banana Frog tag/frame which I felt suited this card.

I now need to get back to my craft room as I have some glittery projects to complete to share with you later!

Saturday 2 October 2010

Sampler Quilt

I have recently started to have sewing lessons as I have always wanted to make a patchwork quilt. I have to say that I am completely in awe of everyones work who attends the group, inspirational comes to mind! I have now had six lessons and I have just completed my sixth panel for my sampler quilt. I have learnt that both accuracy in cutting the fabric and then in sewing a 1/4 inch seam is the key to success. However I still need to master the rottery cutter and the1/4 inch seam.


  'Tumbling Blocks'
My first panel


'Log Cabin'


'Drunkards Path'
Not the best of pictures


'Spiders Web'
My favourite panel


'Bear Paws'


'Flying Geese'


I have added a blue border to each panel and hopefully soon my sampler quilt will be in one piece!

Tuesday 28 September 2010

The Great British Bake Off

Hi everyone, I don't know if you watched 'The Great British Bake Off', which was recently on TV. I really enjoyed it and my sister gave me the book for my birthday. I have to say it was a lovely gift with lots of photos which always inspire me to try new recipes.I have tried several of the recipes now which have turned out really well.

I attempted the Dundee cake recently and the recipe stated to use a 20cm round cake tin which I had and used. The cake when cooked had risen at least an inch over the cake tin and was saved from pouring over the side of the tin by the greaseproof paper and newspaper that i had wrapped around the side of the tin (which was recommended in the book). I guess there was too much cake mixture for the tin.

I have to say the cake was delicious so I decided to make it again this weekend minus the almonds, in fact I decided to make 2 as the recipe suggests you keep the cake for a week before cutting. I followed the instructions making two separate batches of cake mixture.


I then filled the prepared cake tins 3/4 full and put the remaining mixture into a small loaf tin.


I then wrapped around the newspaper to prevent burning.


I removed the cake in the loaf tin earlier as it cooked much quicker than the larger cakes.


 I have to say that I was really pleased with the end results! I am also informed by members of my family that the cake is delicious!


Monday 27 September 2010

Baby shoes

Hi everyone and welcome to my blog, I hope to give you all a glimpse into my creative world, when time allows.

I made these baby shoes for a friend following the birth of her baby boy. The pattern for the shoes was downloaded from Kim's 'Creative Diversions' blog, Kim very kindly placed a link on her blog directly to the template, which i think Kim made for Quiet Fire Design.


I decided to make the shoes personalised  and so added baby Lukes name which i stamped and heat embossed.


I also stamped and heat embossed Lukes date of birth on the sole of the shoes, unfortuately i didn't get a very good photo to show you, but i was pleased with the end results.

I then made a shoe box, complete with weight (birthweight) and price labels.


Priceless which he most definately is!

Stamps used were from the 'JustRite' range and the tiny letters although some what fiddly, worked really well.

Hope you have enjoyed and found just a little inspiration. Thankyou for visiting my blog!